
this post has nothing to do with the generic theme of the blog, but who cares...
I wanted to create an off-line archive of xkcd.com web comic, and found plenty of shell script to do so, but none packaged the image with the mouseover/tooltip text (which for me was half the fun). So i did, what any self-respecting xkcd reader would do, i went on to create one. So here it is for all the xkcd fans.
The link to download the offline archive (from 1-592 in )
https://dl.getdropbox.com/u/138928/xkcd.cbr
the script used to create it.
################################
#!/bin/bash
#Download all xkcd and package with tooltip text
#3rd June, 2009, created by subiet
for i in `seq 1 592`
do
wget http://xkcd.com/$i/
echo "$(grep http://imgs.xkcd.com/comics/ index.html | head -1 | cut -d\" -f4)" | convert -antialias -background yellow -page 1024x70 text:- $i.jpg
wget `grep http://imgs.xkcd.com/comics/ index.html | head -1 | cut -d\" -f2`
convert -append $(ls -t | tail -n 1) $i.jpg $i.jgp
rm index.html
rm *.jpg
rm *.png
done
###################################
http://twitter.com/subiet
Wednesday, June 03, 2009
XKCD offline archive with Mouseover Text
Friday, November 17, 2006
Tilt The Camera
Ok here is a small tip to create interesting snapshots (notice, i haven't said photograph, i will explain in the following posts the difference between snapshot and photograph).
The tip is small, simple and sweet, and it is to simply TILT THE CAMERA. Yeah, tilt the camera at say abt 30 degrees of horizontal, click the picture and then watch your cousins sliding down the floor ;-)
Thursday, November 16, 2006
Miles ahead of the Pack
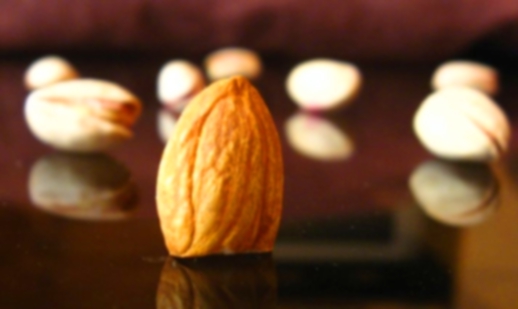 Well the title of the post is the The caption for this photograph, and i recently captured this, and is one of my favorite, primarily because i first thought of a theme (Miles ahead of the Pack), then thought an idea to visualize it, and then the shot also came as i wanted.
Remember this photo hasn't been edited at all by any software (except for resizing for ease of publishing)
Selectively getting the Almond into sharp focus and leaving the rest of the nuts out of focus, even when they were not separated by large distances and not over exposing anything (even with a low aperture value) was slightly tricky, Here is how i did it:
Step 1:
Lowering the aperture value to the minimum, that is allowed by my camera, which is 2.6, It was done to reduce the depth of field to the minimum, so that the least amount of frame is in focus. (But lowering the aperture value, opens up the lens to the maximum, and allows a lot of light to enter, which must be compensated by other things, as explained below)
Step 2:
Setting the shutter speed to faster value than normally used for indoor settings, to compensate for the excess light because of the small aperture.
BUT, the result i got was nothing great, so what i did was i removed the curtains from the right side of the almond, and allowed sunlight to fall on one side, this created a sharp shadow of the ridges in the surface of almond, giving the illusion of extra sharpness of almond, and blurring of the rest of the nuts.
Step 3:
Manually setting the focus to the minimum possible, and then getting the camera lens as close as possible to just get the almond in focus. Now this is important because:
Say, the camera focuses sharply at distance "X", And the distance between the almonds and the nuts be "Y". Now to get a selective focus, Y should be as large as possible when compared to X. This can be done it two ways, one is to increase the Y, but that would have made the nuts occupy a very small area in frame, and the beauty would have been lost. The other way is to reduce X, which is what i did. ;-")
Handy Tip:
Your clothes are brilliant materials to block unwanted stuff out, because you don't have to carry anything extra and they don't reflect back the light, for example, The red background you see is basically my jacket rolled up, to prevent the tv in my living room to ruin the background, however i noticed later, that in the reflection on the glass surface you can see the outlines of the tv. (right-bottom)
Tuesday, November 14, 2006
Save your Lens
Well, this is not a lens cleaning tip or something, It is a simple way of saving your compact camera's lens system.
Well most compact camera's have a retractable lens, which extends on power up, now many of my friends have been unfortunate enough to have their power button pressed accidentally in their jeans pocket or purses, and due to no room for extension, getting their lens' mechanics damaged.
Simple solution:
Always keep your camera's mode switch at playback, instead of shooting, when you are storing it, because in that case the lens would not extend even after an accidental power up, when you want to shoot, just flip it back to shooting mode.
hope this helps.
Ice or Water?
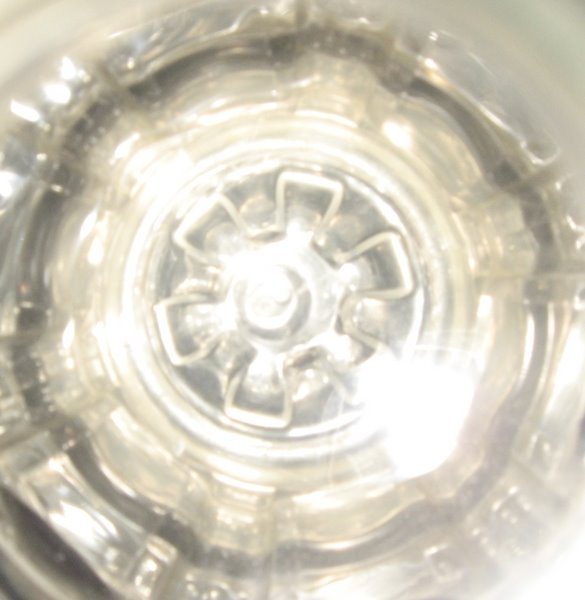
Hey guys, i recent got lucky, and won myself a ticket to Antarctica to visit the world famous museum of objects carved out of ice, and what did i get back for you, well, a photograph of giant wheel, carved out of a single block of ice.
Ok, agreed i am KIDDING, what you see is nothing, but the mundane view of a PET bottle's bottom, filled partially with water (Click to enlarge). An example of how routine things become "cool" when shot in closeup (Macro) Mode
How to do it: (SIMPLE, in every sense of the word)
1)Get a PET bottle, (You can do the following with bottles in different color, to give even more amazing results)
2)Switch your camera to macro mode, put your lens at the mouth of the bottle and click, yeah, Slight tilt of the lens can produce different results, which may turn out to be better or worse.
HANDY TIP: Shake the bottle slightly before taking the picture, so that the wavy water gives a better feel.